The beginning
When you want to manage (create, modify and remove) your infrastructure, getting started with Terraform is easy. Just create files ending with .tf containing the description of the resources you want to have.
For example, if we want to create a small infrastructure in AWS cloud provider:
- a S3 bucket (for terraform)
- a S3 bucket (for our website)
- a S3 bucket (for website logs)
- a CloudFront distribution (without SSl for this example)
We just need to create some .tf files like this:
aws_s3.tf
aws_cloudfront.tf
root.tf
variables.tf
output.tf
aws_s3.tf :
# s3 bucket for terraform state files
resource "aws_s3_bucket" "com_scraly_terraform" {
    bucket = "${var.aws_s3_bucket_terraform}"
    acl    = "private"

    versioning {
        enabled = true
    }

    tags {
        Tool    = "${var.tags-tool}"
        Contact = "${var.tags-contact}"
    }
}

# s3 bucket for front logs
resource "aws_s3_bucket" "front_logs" {
  bucket = "${terraform.workspace == "preprod" ? var.bucket_demo_logs_preprod : var.bucket_demo_logs}"
  acl    = "log-delivery-write"

  tags {
    Tool    = "${var.tags-tool}"
    Contact = "${var.tags-contact}"
  }
}

# s3 bucket reached by cloudfront
resource "aws_s3_bucket" "front_bucket" {
  bucket = "${terraform.workspace == "preprod" ? var.bucket_demo_preprod : var.bucket_demo}"
  acl    = "private"

  force_destroy = false

  depends_on = ["aws_s3_bucket.front_bucket-logs"]

  versioning {
    enabled = true
  }

  logging {
    target_bucket = "${aws_s3_bucket.front_bucket-logs.bucket}"
    target_prefix = "root/"
  }

  website {
    index_document = "index.html"
  }

  tags {
    Tool    = "${var.tags-tool}"
    Contact = "${var.tags-contact}"
  }

  cors_rule {
    allowed_headers = ["*"]
    allowed_methods = ["GET", "PUT", "POST", "DELETE"]
    allowed_origins = ["*"]
  }

  policy = <<POLICY
{
"Version": "2012-10-17",
"Statement": [
{
  "Sid": "PublicReadGetObject",
  "Effect": "Allow",
  "Principal": "*",
  "Action": "s3:GetObject",
  "Resource": "arn:aws:s3:::${terraform.workspace == "preprod" ? var.bucket_demo_preprod : var.bucket_demo}/*"
}
]
}
POLICY
}
aws_cloudfront.tf:
resource "aws_cloudfront_distribution" "front_cdn" {

  # Use All Edge Locations (Best Performance)
  price_class  = "PriceClass_All"
  http_version = "http2"

  "origin" {
    origin_id   = "origin-bucket-${aws_s3_bucket.front_bucket.id}"
    domain_name = "${aws_s3_bucket.front_bucket.website_endpoint}"
    origin_path = "/root"

    custom_origin_config {
      origin_protocol_policy = "http-only"
      http_port              = "80"
      https_port             = "443"
      origin_ssl_protocols   = ["TLSv1"]
    }
  }

  enabled             = true
  is_ipv6_enabled     = true
  default_root_object = "index.html"

  logging_config {
    include_cookies = true
    bucket          = "${aws_s3_bucket.front_bucket-logs.bucket}.s3.amazonaws.com"
    prefix          = "cloudfront/"
  }


  "default_cache_behavior" {
    allowed_methods = ["GET", "HEAD", "DELETE", "OPTIONS", "PATCH", "POST", "PUT"]
    cached_methods  = ["GET", "HEAD"]

    "forwarded_values" {
      query_string = false

      cookies {
        forward = "none"
      }
    }

    min_ttl          = "21600"
    default_ttl      = "86400"
    max_ttl          = "31536000"
    target_origin_id = "origin-bucket-${aws_s3_bucket.front_bucket.id}"
    // This redirects any HTTP request to HTTPS. Security first!
    viewer_protocol_policy = "redirect-to-https"
    compress               = true
  }
  "restrictions" {
    "geo_restriction" {
      restriction_type = "none"
    }
  }
  # Pre-requisits: Put a SSL cert on AWS store in us-east-1 region
  # Generate a csr in loacalhost, make requst to IT, get the returned cert
  # put the cert + intermediate + private key in AWS (click in import button)
  "viewer_certificate" {
    # default certificate if you don't already added one in AWS certificate manager
    cloudfront_default_certificate = true
    minimum_protocol_version = "TLSv1.1_2016"
  }
  aliases = ["${var.demo_domain_name}"]

  depends_on = ["aws_s3_bucket.front_bucket"]

  tags {
    Tool    = "${var.tags-tool}"
    Contact = "${var.tags-contact}"
  }
}
root.tf:
provider "aws" {
  region = "eu-central-1"
}
variables:
variable "default-aws-region" {
    default = "eu-central-1"
}

variable "tags-tool" {
    default = "Terraform"
}

variable "tags-contact" {
    default = "Aurelie Vache"
}

variable "aws_s3_bucket_terraform" {
    default = "com.scraly.terraform"
}

variable "bucket_demo" {
  default = "com.scraly.demo"
}

variable "bucket_demo_logs" {
  default = "com.scraly.demo.logs"
}

variable "bucket_demo_preprod" {
  default = "com.scraly.demo.preprod.demo"
}

variable "bucket_demo_logs_preprod" {
  default = "com.scraly.demo.preprod.demo.logs"
}

variable "demo_domain_name" {
  default = "demo.scraly.com"
}
output.tf:
output "cloudfront_id" {
  value = "${aws_cloudfront_distribution.front_cdn.id}"
}
Now we need to initialize terraform (only the first time), generate a plan and apply it.
$ terraform init
Initializing the backend...

Initializing provider plugins...

Terraform has been successfully initialized!

You may now begin working with Terraform. Try running "terraform plan" to see
any changes that are required for your infrastructure. All Terraform commands
should now work.

If you ever set or change modules or backend configuration for Terraform,
rerun this command to reinitialize your working directory. If you forget, other
commands will detect it and remind you to do so if necessary.
Init command will initialize your working directory which contains .tf configuration files.
It’s the first command to execute for a new configuration, or after doing a checkout of an existing configuration in a given git repository for example.
Init command will:
- download and install terraform providers/plugins
- initialize backend (if defined)
- download and install modules (if defined)
Since terraform v0.11+, instead of doing plan and then apply it, if you are in interractive use, now you just need to execute terraform apply. The command will create the plan, prompt the user, if Yes, apply the plan and make all the changes.
$ terraform apply
...
Do you want to perform these actions?
  Terraform will perform the actions described above.
  Only 'yes' will be accepted to approve.

  Enter a value:
  yes
...

Apply complete! Resources: 4 added, 0 changed, 0 destroyed.

Outputs:

cloudfront_id = 123456789
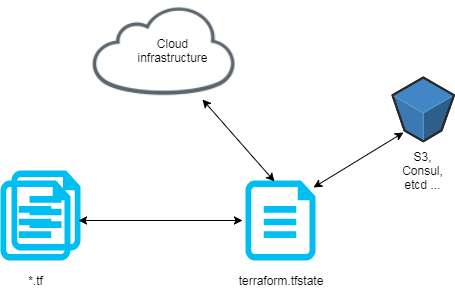
Our infra is created, great. But we work alone, in only one environment.
Tfstate should be store in remote
In a company or in an OSS project, you don’t work alone so you need to stop to store the tfstate locally and start to store it remotely, in the “cloud”, to share it.
For information or reminder, a tf state is a snapshot of your infrastructure from when you last ran terraform apply. By default, the tfstate is stored locally in terraform.tfstate file.
But when we work in team, we must store the tfstate remotely:
We now create a backend resource in order to store the tfstate in a bucket s3 and encrypt it.
backend.tf:
# Backend configuration is loaded early so we can't use variables
terraform {
  backend "s3" {
    region = "eu-central-1"
    bucket = "com.scraly.terraform"
    key = "state.tfstate"
    encrypt = true    #AES-256 encryption
  }
}
When we created the s3 bucket resources in which we put our tfstate, we activate the versioning. It’s not an error or a copy paste. It’s recommended to enable versioning for state files. AWS S3 buckets has that capability, which you can leverage since terraform has a backend for it. Imagine, suddently, your state file got corrupted. Thanks to the state files versioning, you can use an older state and breathe ;-).
We created before our tfstate file so we need to convert local state to remote state (and store our state in the s3 bucket we created):
$ terraform state push
Workspaces
Before terraform workspaces feature, in order to handle with multiple environments, the solution was to create one folder per environment/cloud provider account and put it .tf files. The solution was not convenient, easily maintanable with duplicate .tf files.
Since Terraform v0.10+, to manage multiple distinct sets of infrastructure resources/environments, we can use terraform workspace.
Create workspaces:
$ terraform workspace new dev
Created and switched to workspace 'dev'
$ terraform workspace new preprod
Created and switched to workspace 'preprod'
$ terraform workspace new prod
Created and switched to workspace 'prod'
Select the dev workspace:
$ terraform workspace select dev
List workspaces:
$ terraform workspace list
default
* dev
preprod
prod
After an apply will be successfully executed, now, your tfstate will be stored in the good environment folder in the s3 bucket:
com.scraly.terraform
env:/
    dev/
       state.tfstate
    preprod/
        state.tfstate
    prod/
        state.tfstate
Perfect, because it’s a best practice to separate tfstate per environment.
As you can see in previous .tf files, we can call a variable depending on the current workspace:
bucket = "${terraform.workspace == "preprod" ? var.bucket_demo_preprod : var.bucket_demo}"
Like you saw, with terraform workspaces we manage easily several/multiple environments without headaches.